

So, in my quest to organize, simply and beautify, while of course all the time being highly practical and twin-toddler-proof (yeah, I know ... I don't ask much! lol) it became apparent that not only my Laundry needed an organizational make-over, but my "pantry" too. I hadn't quite planned on doing the pantry yet, but a weavel incident hurried the project along - and prevented a "before" picture. I had already most of the stuff out of the pantry by the time we decided that NOW is the time to do the pantry :)
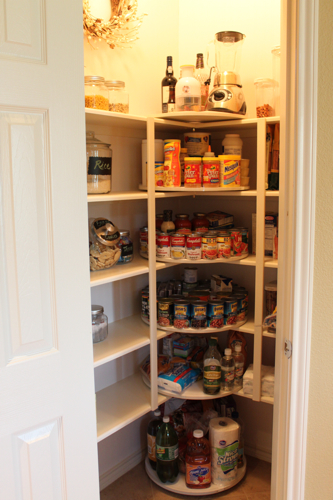
And look at all this organized gorgeousness!! :)
Before:


I say "pantry" because really I don't really have one. I have a closet that is close to the kitchen. It's not a large closet, it's one of those 2 1/2 x 3 1/2 foot coat closets. But it's better than no pantry at all. And I have to fit all that's in that pile and then some in it :p
We also shop in bulk and we have no other place to keep the "refills" as it where. So that little pantry is IT. If it doesn't go in there, or in the drinks cupboard (for juices, sodas etc) or in the double cupboards in the kitchen, it has no place to go.
We do have a garage, and one of these days we will have an organized garage (Don't go there ... I might have a nervous break down if I think about it too much!!) but this is Phoenix, and non-airconditioned garages equal a pretty hot oven for a large part of the year, so they are really not suitable for food storage of any kind.
So the challenge is really to have turn a tiny closet into a functioning ( read easily accessable and overseeable), bulk-accomodating, twin-toddler-proof, and preferably, nice looking space. All in 2.25'x3.5' :) Easy! lol
I loved Shelley's pantry makeover here:
I think she inspired pantry make-overs all over the blogasphere!

Gorgeous, right?
But alas, I do not have the luxury of having another place to put the "refills" :( But I already have crates and labelled them together with various containers with my trusty craft cutter (love doing the vinyl thing these days!) much like Shelley did here. We definitely have the same taste in regards to those things!
I also totally loved the idea of this makeover:
Again, unfortunately I don't have the space to do this quite in that way, nor the luxury of creating a over-the-corner "corner" for the turn tables as it where. Our door to the pantry closet takes up most of the space, only leaving 6 inches to one side, which wouldn't really work with the kind of mechanism Decorchick's father offers. It probably could work to mount the lazy susan on the shelf itself, but we had this weekend to do the pantry and since the lazy susans are a vital part, we just have to go with what we can get locally. And hopefully a little cheaper!
However, I am loving the idea of fully utilizing the corners of my tiny closet, so the lazy susan idea stuck. It was truly one of those forehead-smacking "why didn't I think of that" moments when I saw the corners used that way! One of my main problems with the previous set-up in my pantry was that stuff constantly got lost in the depth of it because it just got pushed back and then you couldn't get to it easily anymore. Deep shelves aren't always a good thing!
I had done a bunch of research on lazy susan ball bearings etc and it all came down to the same problem: If you would need to be able to get to it from both ends to screw it all together and that's just not possible in this set up. Think about it. Once you put your round piece of wood to the ball bearing, how do you then get the srews in to mount it to the shelf? There are some that make that possible/easy, but nothing that would be easily available locally.
As predicted, I couldn't find the ones Decorchick's father is using!
Lazy Susans and turntables are available all over the place of course but the plastic ones wouldn't work for my purposes, and the wooden ones can get pretty pricy!
So, good old IKEA came to the rescue yet again. They have pine lazy susans for $7.99 (SNUDDA)
They are 15" in diameter, which works fine for the 14" deep shelves we are going to have! Even with corner clearance the lazy susans won't hang over too much! They each take something like 27lbs of weight, so I think we're covered!
Since we are making the shelves ourselves too by jigging two 7" boards together with the Kreg Jig , we were able to fix the lazy susans to the shelves from below without interfering with the turning mechanism!

I also got some15" dream catcher hoops for $2/each to serve as a rim around the turn tables, so nothing slides off. They haven't arrived yet though, but they will be easily attached later. I have however found that there isn't any sliding (with adult operation,) but I did mention my "twin-toddler-proof" goal, right? ;)
So after ripping all the old stuff out, the walls didn't look very good and needed a lot of spackling. I also gave it a good coat of antique white all around. It evened things out a bit and it will serve as a base for anything else I might want to do.

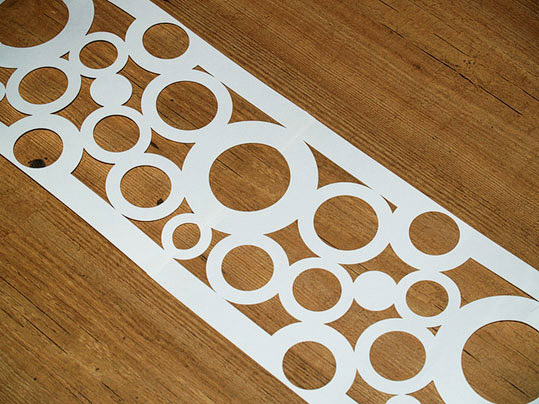
I wanted to somehow decorate the back wall. I had run out of vinyl transfer tape though, otherwise I might have done vinyl, but instead I made a stencil. I decided on circles to reflect the curtain accent trim that I have in the dining room.
Just print it on regular card stock and cut out with a craft knife :)
If you happen to have a Silhouette Craft Cutter, let me know in the comments and I’ll upload that file too :)
So, I had my craft cutter cut out a few of card stock and I pieced them together to fit the length of the feature wall. It won't be reusable forever, but that's ok.
However, once I tried to stencil on that wall, I remembered why I thought of doing vinyl at first. That wall is WAY textured for some reason, not to mention entirely uneven and trying to do a stencil on there was an EPIC FAIL. I was going to take a photo, but I guess I was too anxious to paint over it - I forgot!
Well you live and learn. I am happy to report however, that the card stock stencil didn't do too badly and on a smooth flat surface it would have been just fine and could have been reused a few more passes!
So, maybe back to vinyl then? Only now I have to wait for a few days for the transfer tape to arrive!
Anna and I decided we wanted to paint the shelves in the accent color while Ian put up the shelf braces.

In the quest for using every last square inch that closet has to offer me, I also tried to find something that would let me utilize that little 6" something clearance I had to the side of the door.
Again, IKEA came to the rescue. We have two Benno DVD towers in the living room that we used to use for it's intended purpose of storing CDs and DVDs. But then along came the twin toddlers and all our DVDs ended up opened, lost, scratched or stuffed into slots that weren't intended for CDs/DVDs. Since then we have moved to closed storage for those, but we are left with empty towers.
Well, wouldn't you know it, one of those fit the space perfectly! Again, probably not the most beautiful thing to look at, but highly funcitonal and adjustable, I can tell you! Perfect for the smaller misc stuff!
For the door I have purchased a "hang over the door rack" years ago. That trusty rack has moved with me for many years now. It is an awesome way of utilizing door space in closets. Be it for pantries, craft closets or other little things! The shelves are fully adjustable too, so it will always work for whatever you need it to! The depth is limited of course, but there is plenty of stuff that fits as you will see! And you can get them in all sorts of depth, width and levels of sturdiness. Most run around $30-$50.
For containers I used what I already had. I just beautified it all a bit with decorative vinyl labels :)
1) Bulk containers from Costco. Perfect for the larger size packages.
2) The tall plastic containers are from IKEA
3) Drawer units, also originally intended for CDs I think, but they have housed some of my craft stuff for years. Now they are coming in very handy in the pantry!
4) The wooden crates are from Jo-Anns. They are on sale at $4.39/crate.
5) The square glass containers were from Walmart. I don't know if they still carry them. I bought those 7 or 8 years ago.
6) The large flip top bin is from Ikea too.
And there you have it!


I have to say I am very pleased with how it turned out!
You may see more pics of this again once the vinyl transfer tape arrives and I might decide to do the back wall after all :)
Our labor day weekend family project (except for Max, who wasn't feeling very well!) – what did you do for the long weekend?
I'm linking this project to:
 Pin It


You did a very nice job. I'm sure you will enjoy it!
ReplyDeleteThank you so much for the inspiration!!
ReplyDeleteHey Birgit it looks awesome!!! You did a great job. :)
ReplyDeleteyou did a great job
ReplyDeleteThe turn-table thingy in the pantry is such a good idea! :)
ReplyDeleteI loved the turntables in decorchicks site too!! I do like your (more affordable) method that you got to work for you!! My pantry is a mess right now.....may have to do something about it!!
ReplyDelete