HomeMixed Media ArtCrafts ProjectsTips, Tricks, TutorialsScrapbooking & Project LifeCooking, Baking, RecipesHome & DIY


Showing posts with label mixed media canvas. Show all posts

Friday, April 25, 2014

Around Here Lately

Hello friends! It’s been a while!

Wow, it’s been quite the ride around here for the last few weeks!

So, I thought I’d give you the nutshell low-down of some of the things that have been happening around here lately!

1. There was a lot of this! My husbands family came to visit in March, which was closely followed by my folks visiting from Germany to celebrate my father’s 70th birthday with us!

{Please ignore my sinusitis induced swollen face!}


And this is the portrait I painted for him as a birthday gift.


2. Both my daughter and my husband are currently rehearsing for plays at the local community theater. Two different plays.  Which means rehearsals every night and all weekends between the two of them!


{Anna during the performance of her last play!}


3. While we got through the winter with very little sickness, it seemed to have caught up with us now. First I went down with some icky sinusitis (right in the middle of my folks visiting!) then the kids went down with something too, even though not nearly as bad. They had the good sense to wait with the real icky stuff until my folks left and Max is still down with it right now, having been home for 4 days, sick!


4. I have also had a bit of a redecorating bug, as I have already mentioned, and in addition to being busy sewing a bunch of stuff for the redecorated bedroom (curtains, pillow cases, duvet covers, etc.) I ended up making a few decorative pieces for various spots throughout the house, too.


I’m not quite done yet. I think the living room is next in terms of a redo, which will require quite a bit of DIYing on my part as well. I’m planning on using some of our existing Billy system, but as they don’t make our color anymore, I will most likely have to paint the lot to make it uniform with the extension pieces I am planning on adding and making into a custom “built-in.” However, that is a whole different story and will probably be one of those  “I do a little when I can” kind of projects, as well as a “now that I have this down, let’s paint all the walls while we can and have a minor renovation” type of project.

For now I have, yet again, given my little IKEA drawers another make-over. I think this is the third décor/color change they have been through over the years. I wish IKEA still sold those! They are so much fun to alter!


4. And while looking for something else I came across the instructions for these little beauties and I just adore them! I’ve made two so far but I think I have a few more in me! Aren’t they so cute?


https://www.youtube.com/watch?v=-V9qmKE9wN4


My idea at the time was to make a paper mache mannequin stuck on a candle holder with a chicken wire skirt for my earrings, but then I cake across these sewn ones and I just had to try them!

One as a pin cushion:


By the way, for this one, I used a “candle holder” that I made this way from dollar store items.


The other is for my earrings:


I used drawer pulls for the top of the mannequins.


5. Of course, there is also always the garden. Lots to do there! Planting, harvesting, processing ... weeding!


And Mr./Mrs. Squirrel is back too, which would explain the disappearing strawberries!


{We caught him/her in the act this morning!}


6. Even though I’ve been doing a lot less of the painting kind of art these last few weeks, I have still kept up with  it somewhat. I’ve been working on several faces with the pastel/watercolor/gesso method. Totally new experience for me and really a different style, but I’m loving it!


7. I am currently really into expressing myself through things other than just paintings, so I am also working on my first art doll!  Totally still a work in progress at this point:


8. The other thing that’s been rocking my world:


I love, love, love this pot! It’s amazing! And I’m sure it will be the subject of many a blog post and recipe to come!

For now, let’s just say I haven’t cooked a day without it since I got it!

What is it?

InstantPot is an electric, programmable pressure cooker!

My favorites so far: Perfectly soft boiled eggs in 3 minutes, a full pot of potatoes in 10 minutes, beautiful, rich bone broths/stock in 1 hour (!!!), fluffy brown rice in 20 minutes, whole chicken, incredibly moist and tender in 25 minutes! Oh, and it makes yogurt too (dairy and non-dairy) .... and I get to make it in mason jars!! Oh and dairy-free cheese cake - yep, in the pressure cooker! In 20 minutes!

Basically, it has taken over the function of a pressure cooker, the crock pot, the rice cooker, the yogurt maker and so much more! And the insert is stainless steel, so no issue with non-stick coatings and such!

And non of the scary parts of pressure cooking are involved with this little machine! It has a bunch of built in safety features and  clean-up is so easy!

Anyway, as you can see, I am totally in love with the thing!

If you are interested in knowing more, there’s a nice little video in the amazon listing I linked you to.

And no, I am not affiliated with InstantPot, I just love the pot!


9. I’ve been working on quite a few blog posts recently. But they seem to evolve. So, they started out one way and while writing, they turn another way! As a result, I have quite a few blog posts in my draft folder, none ready to post and all in progress. I will get them all to you at some point. I hope!


10. There has also been a fair bit of this.


Gelli printing is so much fun!

Pin It

Tuesday, March 4, 2014

The Big 20/20 Event: Day 4: How To Paint From The Soul

Welcome back to “The Big 20/20 Event” - I am so glad you’re joining us! We will be sharing 20 fantastic tutorials from a host of awesome contributors, for 20 days.
If you enjoy the tutorials, make sure you sign up for my newsletter, as all my newsletter subscribers will receive a beautiful PDF eBook at the end of the event, showcasing all 20 tutorial projects to keep and peruse at their leisure!


Here we go with our Day 4 tutorial.

~*~*~*~*~*~*~*~*~*~*~*~*~*~*~

The Big 20/20 Event: Day 4: How To Paint From The Soul


painting from the soul


This post is brought to you by the lovely Jeanette.

Here is my tutorial using directions and photographs to guide you to create a beautiful painting using your own beautiful creativity and some simple directions. I am going to give you an overview that you can use to access your own creative Source. In essence, painting to me is all bout getting out of my ego, connecting to Source (just being open to what may come) and playing.

There may be some struggles and self talk along the way, that tells you "you are silly", "you can't paint", "this isn't working" and so on. I want you to try and temper this with the patience of a saint. Sooth that inner voice with reassurance. Tell her you are just playing and give her permission to not put too much pressure into what comes out of all of this. I remember years ago reading a quote in Julia Cameron's, The Artist's Way, that said, "In order to paint something well, we must first be willing to paint something poorly". I am pretty sure that no one has ever picked up a paint brush for the first time and painted like Picasso!

In this painting I used acrylic, full bodied and liquid, stamps, ink pads, bits of old writing, found objects, I use matte medium for gluing as well as to make my paint more moist when it dries out as I go, a selection of small brushes and anything I feel inspired to throw into the mix. In this first picture you can see the bin that I have some of my stuff in. I drag it out and put it away each time because I live on a boat. I can tell you a lot about how you do this painting, but I can't convey the hours of painting I have done on other paintings to get to this point! You must be willing to play.

You will learn little tricks along the way that will make the next painting more interesting! The most important factor is for you to know you are indeed an "artist". It is your birth right! Just hold that intention in your beautiful heart and begin. I suggest painting on art board to start. It is small and you can do lots and still store them! I did many this way! You may think that they won't be as important if they are on board, but I am here to tell you that I sold some of my early pieces to a very enthusiastic fan, who framed them and has since put them up on a wall in his beautiful home.

Here Is what he has to say:

Jeanette, Your work has made quite an impression on the owner of the White Rock Art Gallery. She came out and said, 'Bruce, you're not going to believe this..' (And I'm not even going to try to tell you!) But after the three had wrapped it all up she said, 'Shoot!' 'We need pictures!' 'Did we get pictures for our site?' Hehe.. I mean, they have $20,000+ paintings in their gallery but had never been quite so impressed with the pairing of art and frame!  Although she doubted whether a picture could do justice to just how incredibly beautiful they are, she made me promise to try and get one of my photographer friends to give it a try. Jeanette, Jeanette, Jeanette.. how fortunate we are to have discovered the brilliant, happy shine of your artistic expression. Glory, glory.. Hallelujah! When the sun lights up the pink room I will try and get us all a good shot! Meanwhile, it's Lindy's face that's really lit up! Thanks, eh!

You have no idea how much this makes my heart sing...woo hoo! And the beautiful part is you can do this too! xo. So don't under-estimate the possibilities of these early pieces! Art is all about believing you can paint and having fun!


the blank canvas


STEP 1

As you can see I started with a blank white canvas this time. I want to mess it up as quick as possible and get over that inclination to keep it all pretty and the "p" word....perfect. For me this isn't too much of a problem...I am a messier girl! I like color and texture so much better than obtrusive white.

Backgrounds are an opportunity to try new things for me. In this painting, I used some Golden Acrylic paints and Stevensons' (a Canadian brand) as well. I work with a matte medium for collage and glue. It is just a polymer like they use in paint without any colour. I have collected bits and pieces, letters, and pictures to use in my painting. I often use magazines and rip and tear and cut, but this time I never used any magazines.
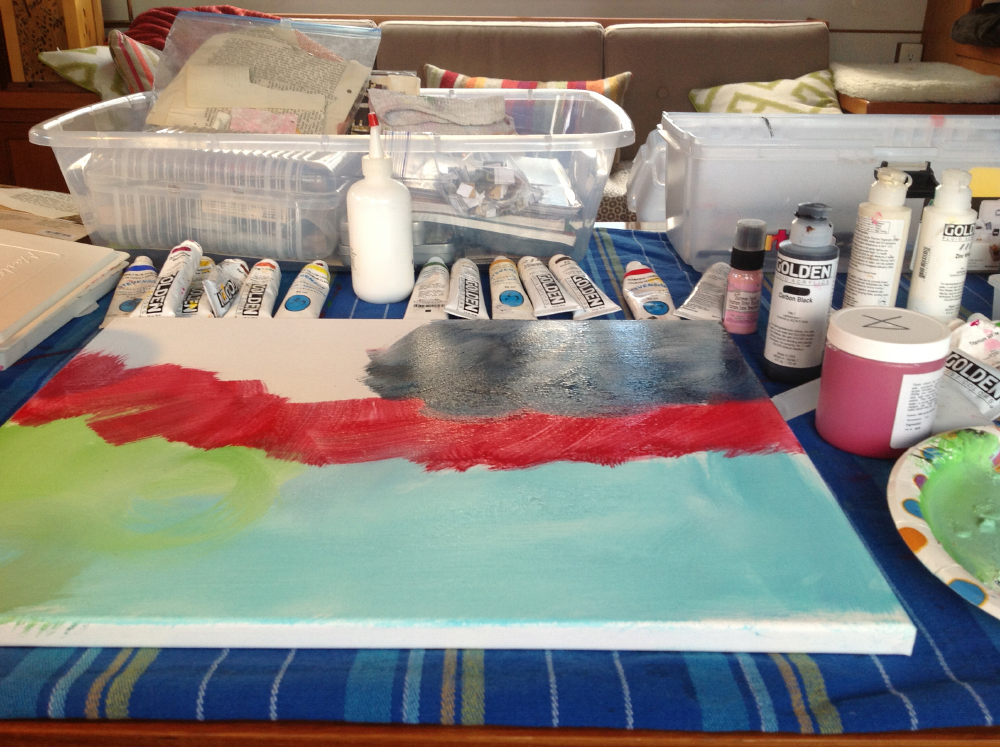
 

paints galore

STEP 2

Usually I drag out books I have of other artists works that I admire and I even bring out my old paintings. I will not be copying them, but they help me get out of myself and give me inspiration. I am pretty sure everyone does this. Or I look on the web for ideas to get my creative juices going. It really helps! Then I just take the plunge and spread some paint around!
 

beginning to emerge

STEP 3

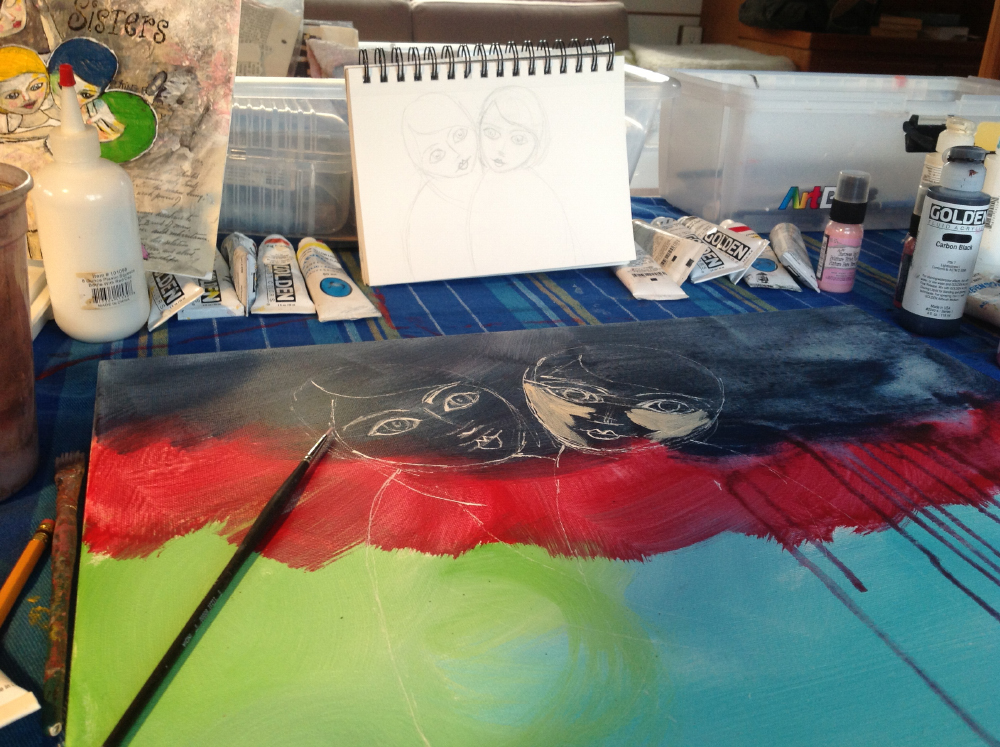
I start with a rudimentary sketch of the subject matter. In this case I drew a couple little cuties. It gives me a direction to go in. Creating art is really all about opening up to take risks and not getting too attached to what you put down in the first few layers!

So have fun with it! I used a little tiny spray bottle with water in it, to get the acrylic paint to run in drips. I wanted to try this and thought I could have incorporated it into the piece. This makes for an interesting background. Art is what happens when your busy making other plans. Turns out I didn't really use it, but it did become part of the whole!


faces become clearer


STEP 4

I used a white acrylic pen to draw on the faces. I find white blends easier. You could use a white water color pencil as well. Then I start using a skin colored paint to build up the face. By the time I  feel satisfied with the face, I have put down a lot of paint. I like where the face is going but still not sure about the eyes.

Something wasn't feeling right about the eyes on the right, so I colored it in and stuck some print over it. I did this with both of their mouths. I wasn't loving something about them, the position or shape or whatever...but I like some writing on my faces coming through so I don't get too worked up over it! Remember not to get too upset that things don't go where you think they should the first time, the second time...and so on.

Entertain the possibility that it can go somewhere way better than you have in mind, if you remain open to it!  I talk to myself all the way through the painting. I say things like, "it will work out" and "don't give up"! And you know what? It always does! You will feel so good that you worked through all this inner self sabotage and got to that sacred place where your creativity lives!. And the more layers the better. Just keep that in mind.


texture added


STEP 5

So, now you can see that I have worked through the issue with the eyes and mouth and see the print coming through! I have added some hair color. I am often drawn to characters of this coloring because my sister and I are like this! She is a brunette with brown eyes and I am (was) a blonde with blue eyes! I have added some cheek color as well.


happy faces


STEP 6

The faces are becoming more defined in this shot. I have added more color to the hair and slimmed the faces down using the hair . You can see I added big wings which I later changed. I do like them but I wasn't being inspired to do something with them. I don't worry about changes. I know it will add more interest in the long run. I stand back away from the piece I am working on often to gain perspective and allow the painting to tell me where it wants to go. It wanted to have little butterfly wings and flowers...so off in that direction I went!
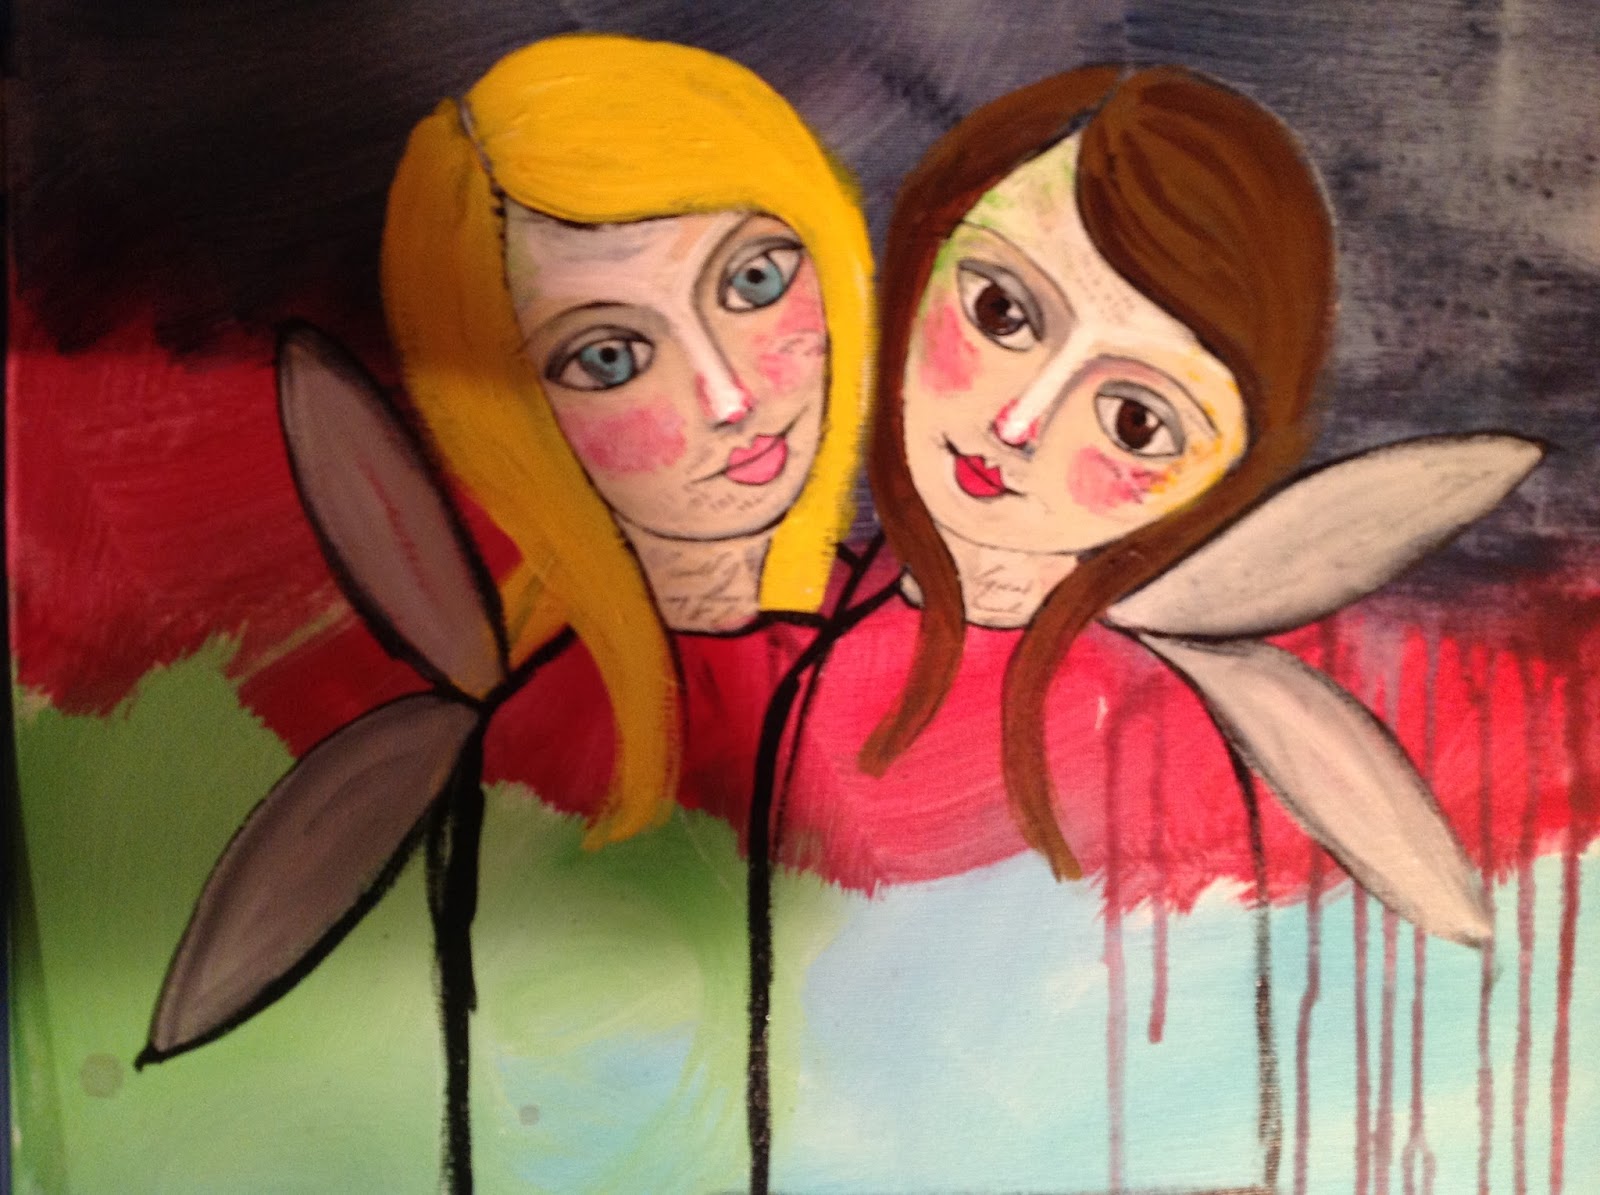
 

wings


STEP 7

I have added a bit of interest to the background using a big brush dipped in white paint and made three swirling circles...ooooh I like! and used an ink blotter to add some polka dots. I used my finger to make the black circles and surrounded them with white. I like this effect.

Even though it got covered up, I may try this technique in another piece! Notice the lettering I was using. I tried it out and did not like it. I have some stamps with letters that I stamped onto paper and cut out in squares that I ended up using. I am going to go buy some archival ink pads, because they are water proof. I sprayed the letters with hairspray. to protect them from matte medium making them run. I also played with some stamping techniques for the background. so, you can see there is a lot of experimenting going on! I am becoming more skilled and knowledgeable with each piece! You can too...just get painting!
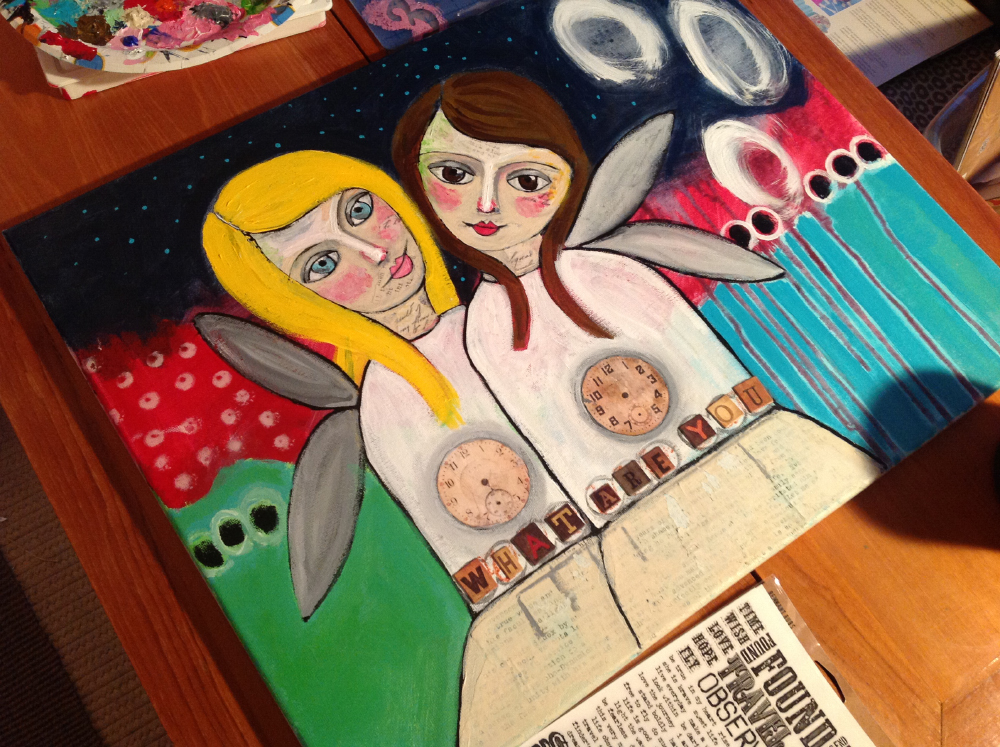
 

time


STEP 8

I decided to make the letters for this piece using my stamps. I am building a collection of stamps and a knowledge base about them. I have to tell you that this part really has my attention. I am going to learn more and incorporate it into my work. I LOVE stamps!


stamping chaos


STEP 9

Getting closer to the final product! I have made some flowers , glued down clocks. As I go I start getting a message about what this all about. This time I was hearing. Tick tock, what are you waiting for.

Originally I had tick tock on the big wings, with those big letters. It was too much so the it morphed a little into this. Now it has "Dear Hearts, What Are You Waiting For" on it. I was kind of wondering about why we don't just start somewhere right now Because, if we wait for the perfect opportunity, it will never arrive and we won't ever follow our hearts and passions!
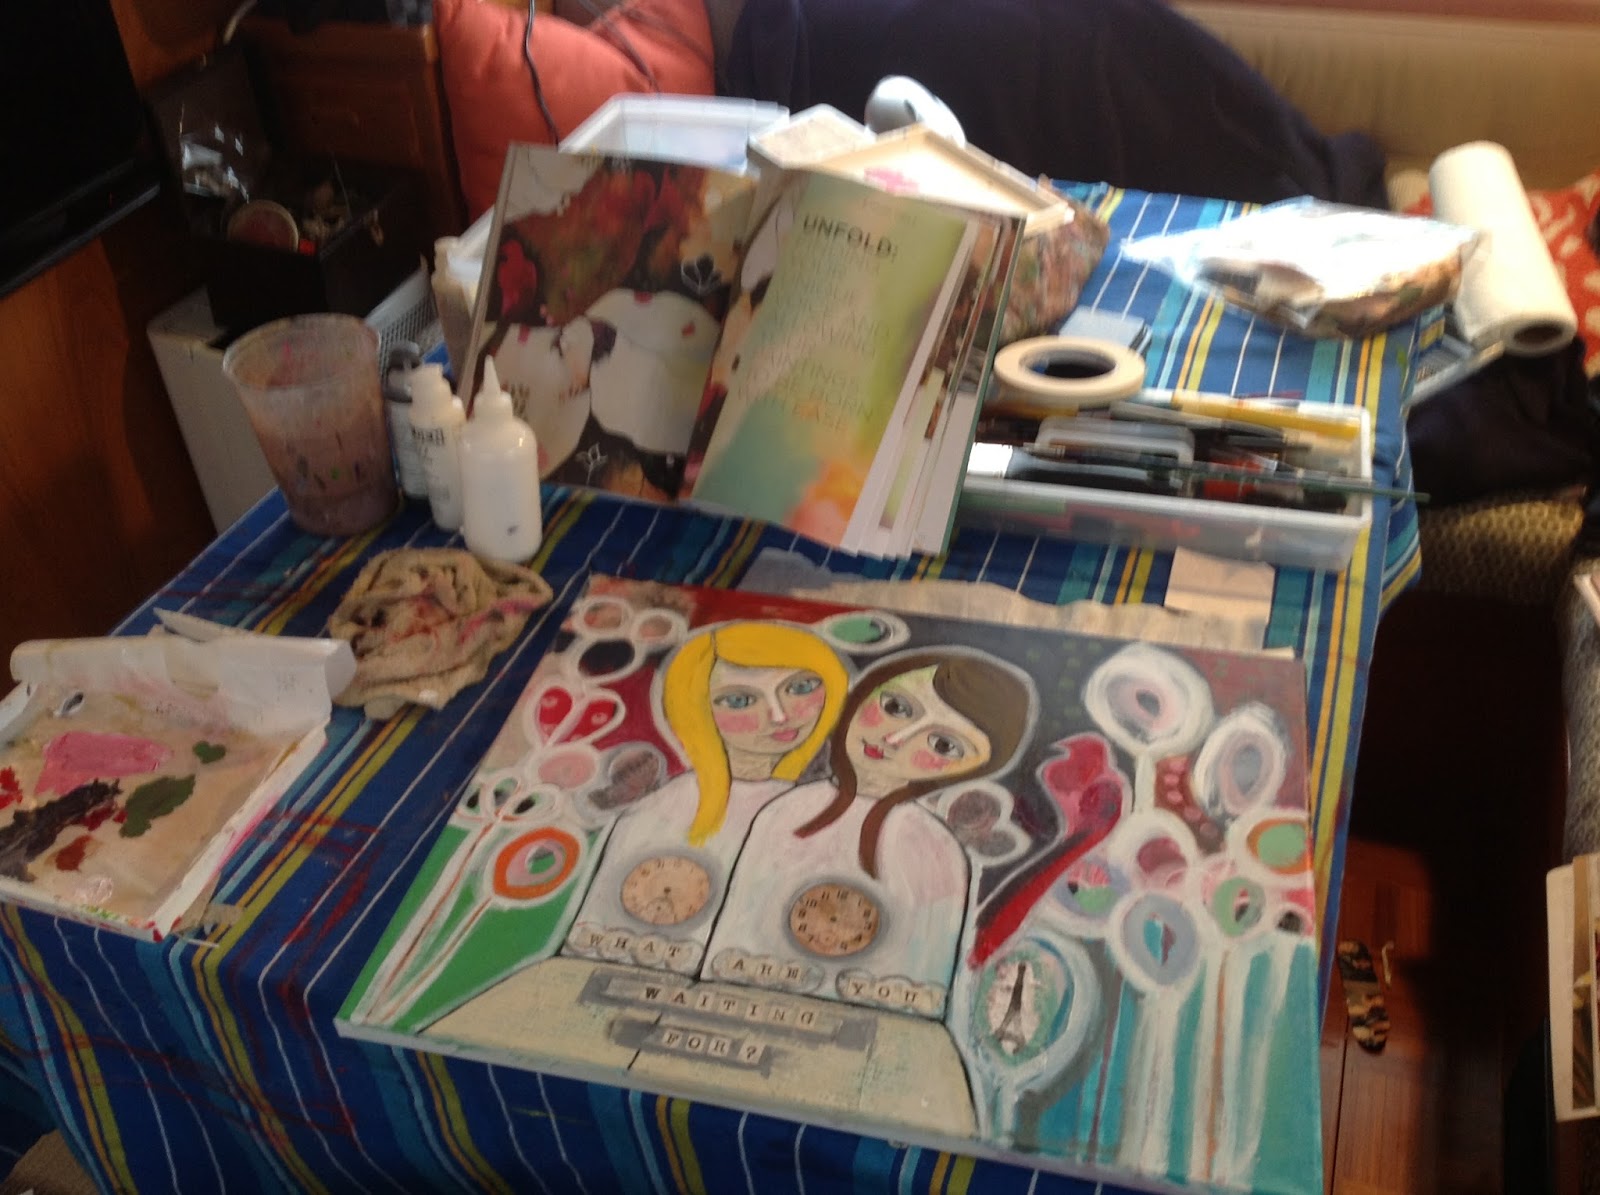
 

background work


STEP 10

The finished product has the background a bit more subdued and soft. I don't like thinks too stark. I am learning this about myself. I was drawn to create a more soft and serene feeling. When things are too hard I am left feeling uninspired. I like gentleness and the midnight blue, red and teal background was causing me to feel cold. The letters are better.

I wanted to work them in without being too fussy. I know that I can be inclined to make things too "just so". I am working on this and giving myself permission to be a bit more free. This is the attributes of other creatives I am really drawn too. But I express myself from where I am and that is just fine! I really have to love myself where I am at. This is the gift I choose to give myself, and that is what makes it okay for me to paint!

I have a collection of odds and sods and among them was that tiny pewter frame. At the last minute I had this intense desire to glue it down on this piece! I found the key that has "Secret" written on it! This is perfect, because, I believe,  the key to manifestation is to begin! To hold that beautiful intention in your heart and take steps into the unknown. To have faith that if you leap the net will indeed appear!
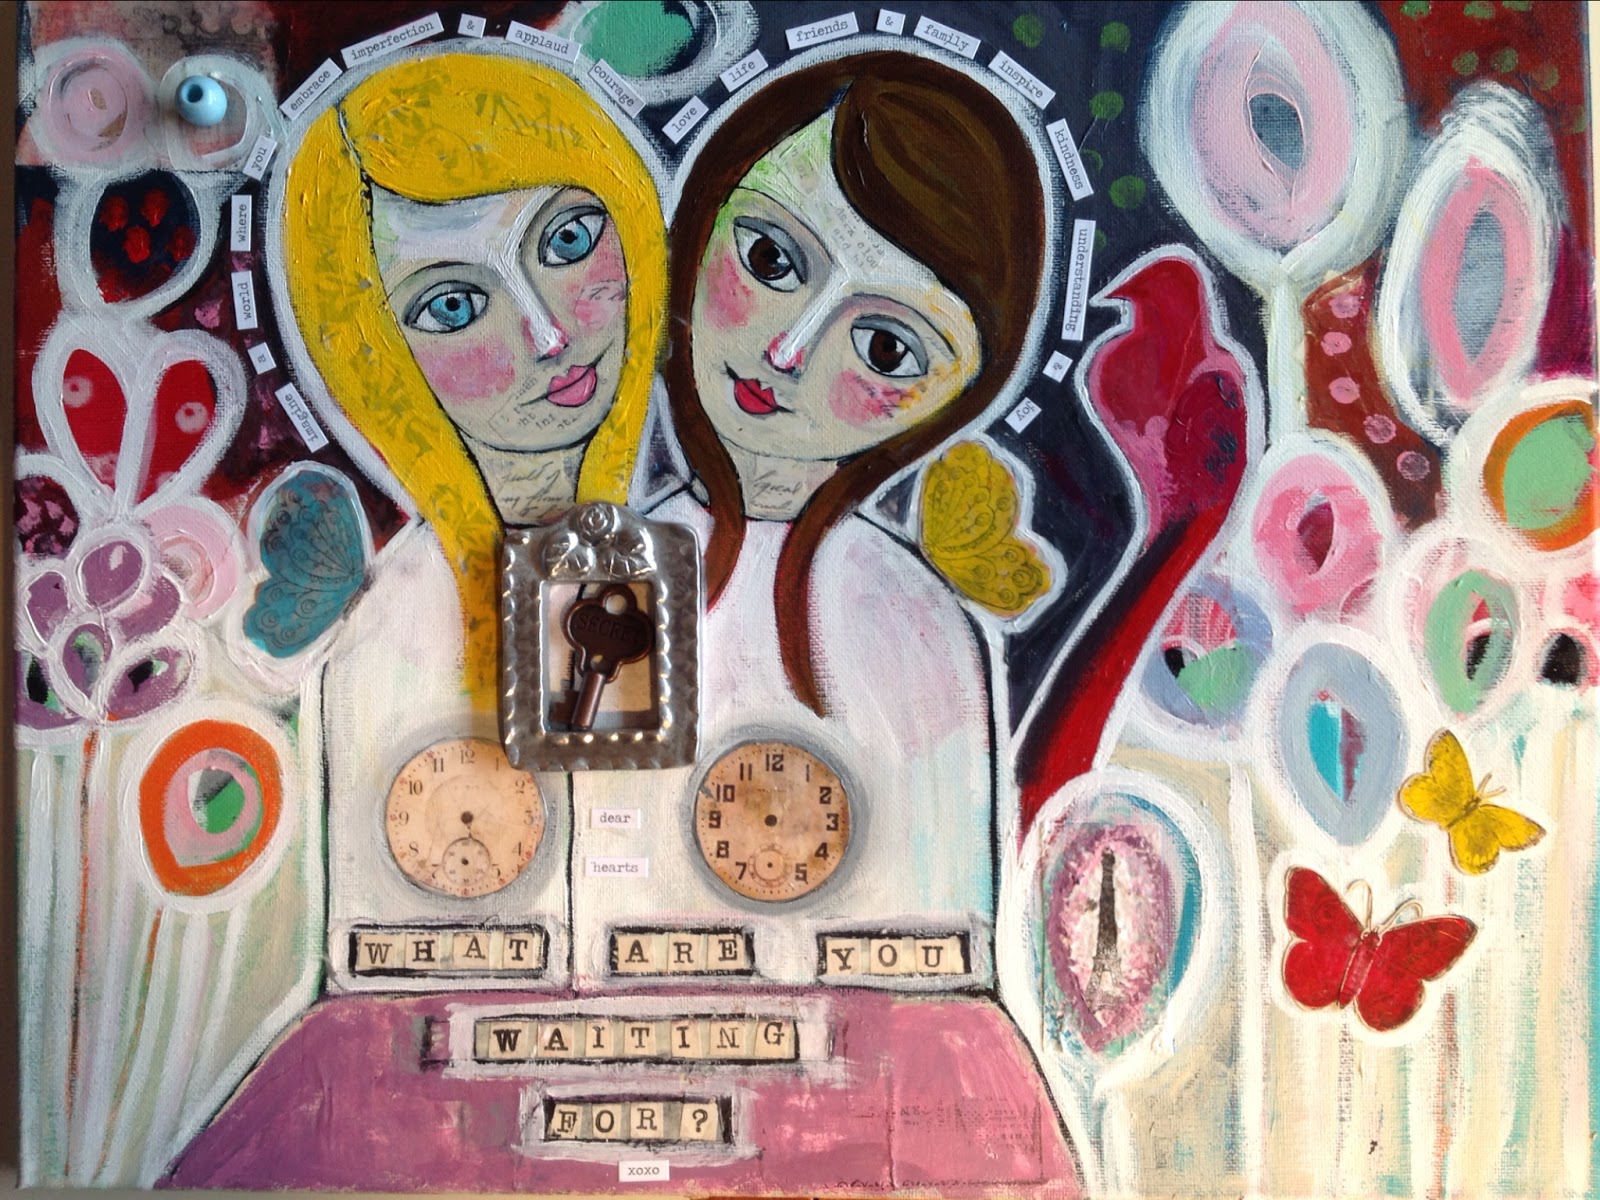
 

the finished product


If you have enjoyed my little tutorial, please feel free to send me a little testimonial to info@jeanettemacdonaldart.com.

I am thinking about creating an online course or e-book and would so love to be able to use your feedback and testimonials if you feel called to contribute this to my work!

It has been my pleasure to write this. I have had many of my soul sisters, and fans ask me what my process is. So this is my gift to you for being interested in who I am! I hope it helps you on your quest for creativity. And be assured there will be lots of inspiration coming in my future blogs! Thanks for signing up today and I am excited to share the creative journey together! 

Lots of love to you all! xo Jeanette

Pin It

Monday, February 10, 2014

On a Roll And A New Etsy Store Option.

1. On A Roll. I have been on such a roll this last week with the splatter paintings. What started out as a Lifebook 2014 lesson, has taken on a whole life of it’s own.

All of a sudden a certain technique with these ink sprays seems to emerge for me - and to be honest, nobody is more surprised than me that these bold, colorful, out-of-control (in a way) paintings are actually coming out of me!

But, I’m going with it, because I am having way too much fun! I am completely smitten with the boldness, vibrancy and dynamic of  these splatter paintings!

Since my last post there have been several more paintings!

Last Friday, I sat down to make another painting, but I wanted to take it another way. Until I saw this:


To me, there are the very clear outlines of a female face in there! Yes, faces are my theme right now!

Can you see it? The nose over on the left, further down a little, the chin, receding to a neck there by the 4 yellow spots? Up on top, where the yellow goes into the pink, the hairline going into somewhat of a gathered bun on top?

Don’t see it? Doesn’t matter! We all see different things! Here is what I saw:


And with this painting I also discovered this neat thing the Dylusions spray inks do. They are water soluble, which is great for the splattering in the first place, however, it also means that even when they are dry, they dissolve a little bit when you make them wet again. Not a lot, but for me, just enough to get some shading and contouring done for the face.

So, now I’m totally into playing with all those possibilities!

I explored this a little further in this painting. I call it “Receiving”!


I’m having trouble really capturing them in their true splendor, as the shimmer mists I use, just shows up either flat in the scanned pictures, or as a brighter area in the scan. If I’m taking an actual photo, at low light and from various angles that bring out the shimmer, the color of the painting is no longer quite true and the image is every so slightly out of focus!

Here you can see the gold flecks a little more:

I have a feeling I am nowhere near done with these, so chances are there will be many more in future posts!


2.) Offering personalized options on my prints.

Quite a few of these paintings will at some point go into my Etsy store. Some as originals, but most will be as fine art prints and greeting cards in various formats.

Since I always capture my images and paintings prior to adding my words and quotes (except for  the mini canvases) I thought it would be fun to offer you the option of adding your own word for the year, word of relevancy, quote, etc.

I am also offering an intuitive option, if you would like me to choose a word/quote relevant to you.

So far I have added these options to these to prints:


Just click on the images to go to my etsy store and see more details!


3.) Love this quote!

"Life just turns deliciously quirky when you stop resisting yourself and, instead, honor the intuition that tugs at you like a puppy on a leash in the park. Follow the magic and magic starts to follow you." Tama J. Kieves

YES!

Where is the magic taking you at the moment?

Pin It

Wednesday, January 29, 2014

A Little Bit Of Everything

1. Our Daily Tomato Harvest.

Yes,  in January! That is unusual even for Phoenix! Several of our tomato plants survived the frosts (partly thanks to some frost cloth action on my part) and have been producing tomatoes all through winter for us. Slower and smaller than the ones we would get when the nights aren’t quite so cold, but nevertheless an abundance of tomatoes!


2. New Items In The Store

I have two new items in my Etsy Store.

First of all, canvas #3 in the “Follow The Whispers” series:


{Mixed Media Canvas - 8" x 8", stretched canvas.}

The words on the canvas read: Remember who you wanted to be.


And here are the little ladies together!


I also put the “Hello Moment” canvas in the store.


{Mixed Media Canvas - 8" x 8", stretched canvas.}

The words on the canvas read: Breathe in. Hello Moment. Breathe out. I am here.


3. Craft related money saving tip.

Do you know those awesome Ranger crafting mats that nothing sticks to?


Yes,  I love to work on those! They just wipe clean, whatever you throw at them.

However, they are usually anywhere around $9- $20 a pop and I use more than one in my office/arts/crafts room, and on more than one table/location. My kids use them, I even use them in the kitchen!


Turns out, that these Non-Stick Dehydrator Sheets are EXACTLY the same thing, only you get 5 of them for $10! 

They are square instead of the Ranger rectangular shape, but honestly, I don’t really care! By the way, they stick together really well with some clear packing tape!


Oh, and Blitsy has everything Martha Stewart for enamel and glass crafts on sale today, if you are stocking up on any of those!


4. Some in-progress yummy-ness from my studio.


Have a wonderful day, everyone!

Pin It

Thursday, January 23, 2014

Second Canvas in the “Follow The Whispers” Series Is Now Available!


Here’s my second little lady in the “Follow The Whispers” Series on 8x8 canvases.

Her words say:

Breathe.

Be still.

Listen to your heart.

Follow the whispers.


You can find her here in my Etsy Store.


This little piece is hard to photograph in it's true colors as the presence of shimmering accents and layers make it appear a little different every time and from every angle!
It is a richly textured piece, with a multitude of delicate layers, patterns and drawings, as well as shimmering accents that make the piece come alive!
The real branches are invisibly sewn onto the canvas to hold securely.


I am having so much fun with this little canvases! They are really calling me at the moment! In process, in flow, in picture and in word.

Also, even though no longer visible under the many many layers, but there in intention and energy, I wrote the word “courage” over and over! It just makes me smile, knowing that this little canvas is going out into the world, filled with courage!


Number III is already well on the way too - yes, there have been many very late nights in my life lately! 


{Canvas I and II in the series!}

Pin It